- HTML Programming Syllabus
- Course Overview
- The course aims to build a solid foundation in HTML (HyperText Markup Language), progressing from fundamental concepts to advanced topics. Through a blend of theoretical lessons and hands-on practical exercises, students will develop the skills necessary to create well-structured, accessible, and visually appealing web pages. The syllabus is organized into modules that systematically cover essential aspects of HTML, ensuring a thorough understanding of the language and its applications in web development.
- Learning Outcomes
- By the end of this course, students will be able to:
- Understand HTML Fundamentals: Grasp the basic syntax, structure, and elements of HTML.
- Create Structured Web Pages: Utilize various HTML tags to build well-organized and semantically meaningful web pages.
- Incorporate Multimedia and Forms: Embed images, videos, audio, and create interactive forms for user input.
- Implement HTML5 Semantics: Use semantic HTML5 elements to enhance accessibility and SEO.
- Integrate CSS and JavaScript: Apply basic CSS styling and JavaScript functionality to enhance web pages.
- Design Responsive Web Pages: Create layouts that adapt to different screen sizes and devices.
- Ensure Web Accessibility: Develop accessible web content that complies with accessibility standards.
- Optimize for SEO: Implement best practices for search engine optimization to improve web page visibility.
- Develop Comprehensive Projects: Apply all learned concepts to create complete web projects that solve real-world problems.
- Module-Wise Content
- Module 1: Introduction to HTML
- Objective: To provide an overview of HTML, its history, importance in web development, and set up the development environment.
- Topics:
- What is HTML?
- Definition and Purpose:
- HTML stands for HyperText Markup Language.
- It is the standard language for creating and structuring web pages.
- HTML uses tags to define elements such as headings, paragraphs, links, images, and more.
- History of HTML:
- Developed by Tim Berners-Lee in 1991.
- Evolution from HTML4 to HTML5, introducing new semantic elements and multimedia support.
- Definition and Purpose:
- Understanding the Web:
- Client-Server Architecture:
- Client: The user’s web browser that requests and displays web content.
- Server: Hosts the website’s files and responds to client requests.
- HTTP Protocol:
- HyperText Transfer Protocol is used for transferring web pages.
- Basics of how browsers and servers communicate.
- Client-Server Architecture:
- Setting Up the Development Environment:
- Choosing a Code Editor:
- Popular options: Visual Studio Code, Sublime Text, Atom, Brackets.
- Browser Developer Tools:
- Inspecting elements, debugging, and testing responsiveness.
- Creating and Opening HTML Files:
- File extensions (
.html,.htm). - Basic folder structure for web projects.
- File extensions (
- Choosing a Code Editor:
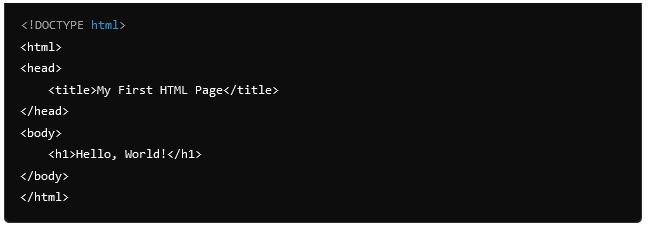
- Basic Structure of an HTML Document:
<!DOCTYPE html>declaration.<html>,<head>, and<body>tags.- Meta tags and their significance.
- Title of the web page.
- Description: This module introduces students to the fundamentals of HTML, outlining its role in web development. Students will set up their development environment, familiarize themselves with code editors and browser tools, and learn the basic structure of an HTML document. Understanding the foundational elements of HTML is crucial for building more complex web pages.
- Practical Exercises:
- Install and configure a code editor.
- Create and open a simple “Hello, World!” HTML page.
- Modify the basic HTML structure to include a title and a heading.
- Explore the interactive features of browser developer tools.
- Example:
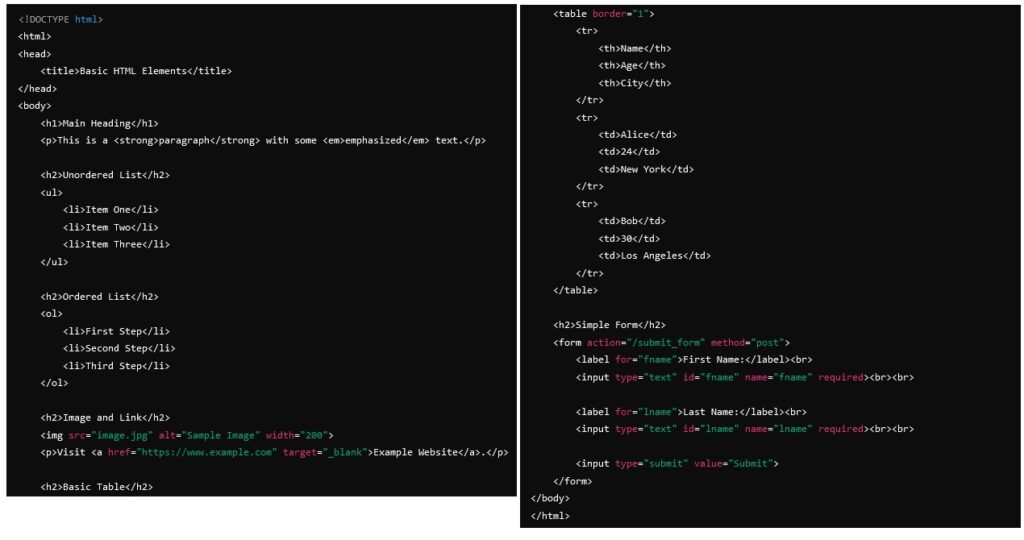
Module 2: Basic HTML Elements
Objective: To understand and utilize basic HTML elements to create structured and meaningful content.
Topics:
Text Formatting Tags:
- Headings:
<h1>to<h6>. - Paragraphs:
<p>. - Bold and Italic Text:
<b>,<strong>,<i>,<em>. - Line Breaks and Horizontal Rules:
<br>,<hr>.
- Headings:
Lists:
- Ordered Lists:
<ol>,<li>. - Unordered Lists:
<ul>,<li>. - Definition Lists:
<dl>,<dt>,<dd>.
- Ordered Lists:
Links and Navigation:
- Hyperlinks:
<a href="URL">. - Absolute vs. Relative URLs.
- Opening Links in New Tabs:
target="_blank".
- Hyperlinks:
Images:
- Embedding Images:
<img src="image.jpg" alt="Description">. - Attributes:
src,alt,width,height. - Image Formats and Optimization.
- Embedding Images:
Tables:
- Basic Table Structure:
<table>,<tr>,<td>,<th>. - Merging Cells:
rowspan,colspan. - Styling Tables with CSS.
- Basic Table Structure:
Forms and Input Elements:
- Form Tags:
<form>,action,method. - Input Types:
text,password,radio,checkbox,submit,reset. - Labels:
<label for="id">.
- Form Tags:
Description: This module covers the essential HTML elements used to format and organize text, create lists, insert images, establish hyperlinks, and build tables. Students will learn how to structure content logically, enhancing both readability and user experience.
Practical Exercises:
- Create a multi-heading page with various text formatting.
- Build ordered and unordered lists with nested items.
- Insert images and ensure they are properly displayed with alternative text.
- Create navigation links between different HTML pages.
- Design a basic table to display data.
- Develop a simple form with different input types and labels.
Example:
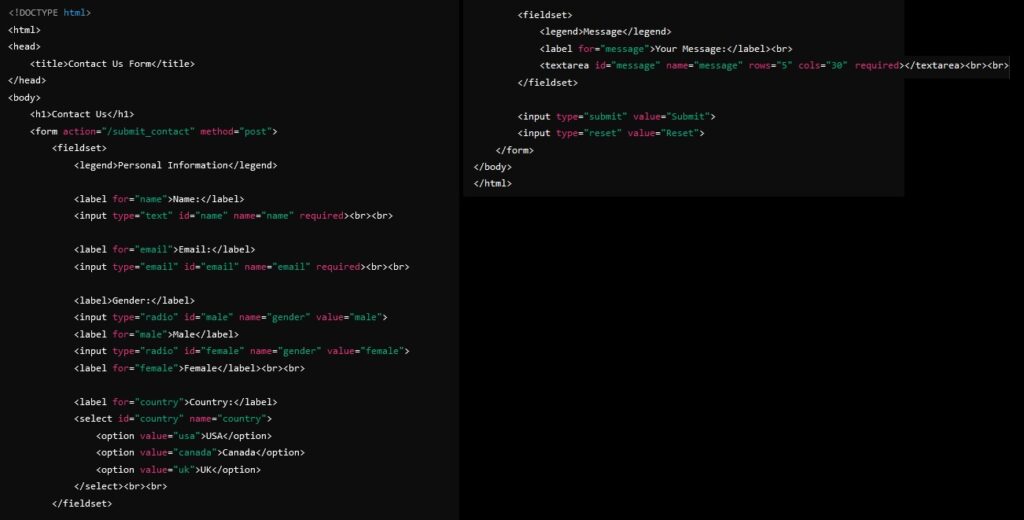
- Module 3: HTML Forms and Inputs
- Objective: To create interactive forms for user input and understand form handling.
- Topics:
- Form Structure:
- Form Tag:
<form>and its attributes (action,method,enctype). - Fieldsets and Legends:
<fieldset>,<legend>for grouping related elements.
- Form Tag:
- Input Elements:
- Text Inputs:
<input type="text">,<input type="email">,<input type="number">. - Password Fields:
<input type="password">. - Radio Buttons:
<input type="radio">. - Checkboxes:
<input type="checkbox">. - Submit and Reset Buttons:
<input type="submit">,<input type="reset">.
- Text Inputs:
- Select Menus and Options:
- Dropdowns:
<select>,<option>. - Multiple Selection:
multipleattribute.
- Dropdowns:
- Text Areas:
- Multiline Input:
<textarea>.
- Multiline Input:
- Labels and Accessibility:
- Associating Labels:
<label for="id">. - Accessibility Best Practices for Forms.
- Associating Labels:
- Form Validation:
- HTML5 Validation Attributes:
required,pattern,minlength,maxlength. - Custom Validation using JavaScript.
- HTML5 Validation Attributes:
- Advanced Input Types:
- Date Pickers:
<input type="date">. - Color Pickers:
<input type="color">. - File Uploads:
<input type="file">.
- Date Pickers:
- Submitting Forms:
- GET vs. POST Methods.
- Handling Form Data on the Server Side (Introduction).
- Description: This module explores the creation of forms, which are essential for collecting user input on web pages. Students will learn to use various input elements, organize forms with labels and fieldsets, and implement basic validation to enhance user experience and data integrity. Emphasis is placed on accessibility to ensure that forms are usable by all users, including those with disabilities.
- Practical Exercises:
- Create a contact form with text inputs, radio buttons, checkboxes, and a submit button.
- Design a registration form with password and email fields.
- Implement a dropdown menu for selecting a country.
- Add client-side validation to ensure required fields are filled out correctly.
- Develop accessible forms with proper labels and instructions.
- Create advanced forms using date pickers and file uploads.
- Example:
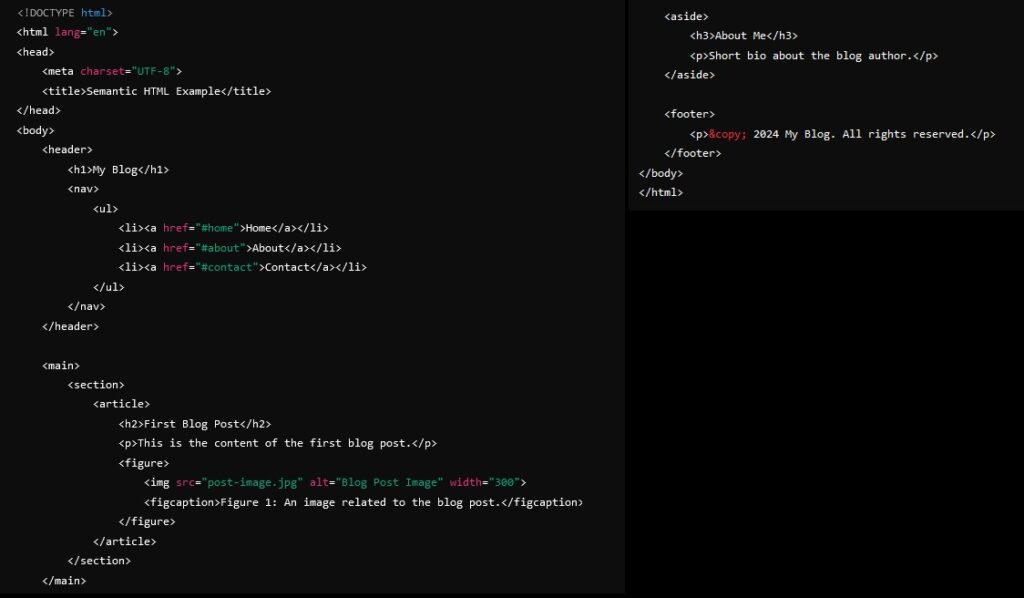
- Module 4: HTML5 Semantics and Structure
- Objective: To utilize semantic HTML5 elements to create meaningful and accessible web pages.
- Topics:
- Introduction to Semantic HTML:
- Importance of Semantics:
- Enhances accessibility.
- Improves SEO.
- Makes code more readable and maintainable.
- Benefits for Accessibility and SEO.
- Importance of Semantics:
- Semantic Elements:
- Structural Elements:
<header>,<nav>,<main>,<section>,<article>,<aside>,<footer>. - Differences Between Semantic and Non-Semantic Elements.
- When to Use Each Semantic Element.
- Structural Elements:
- Structuring Content with Sections and Articles:
- Using
<section>for Thematic Grouping. - Using
<article>for Independent Content.
- Using
- Using
<figure>and<figcaption>for Media:- Embedding Images and Captions:
<figure>,<figcaption>.
- Benefits for Accessibility and SEO.
- Embedding Images and Captions:
- Accessibility Considerations:
- Using ARIA Roles with Semantic Elements.
- Enhancing Screen Reader Compatibility.
- Best Practices for Semantic HTML:
- Proper Nesting of Elements.
- Avoiding Redundant or Inappropriate Use of Tags.
- Description: This module emphasizes the use of semantic HTML5 elements to enhance the meaning and structure of web content. Semantic elements improve accessibility for users with disabilities and optimize web pages for search engines. Students will learn to organize content logically, making web pages more maintainable and user-friendly.
- Practical Exercises:
- Redesign a non-semantic HTML page using semantic elements.
- Create a blog layout using
<header>,<nav>,<main>,<article>, and<footer>. - Embed an image with a caption using
<figure>and<figcaption>. - Implement ARIA roles to enhance accessibility.
- Organize content using
<section>and<aside>for better structure. - Example:
- Module 5: Multimedia Integration in HTML
- Objective: To embed and manage multimedia content such as images, audio, and video in web pages.
- Topics:
- Images:
- Formats: JPEG, PNG, GIF, SVG.
- Optimizing Images for Web Performance.
- Responsive Images: Using
srcsetandsizesattributes. - Image Accessibility: Proper use of
altattributes.
- Audio:
- Embedding Audio Files:
<audio>tag. - Attributes:
controls,autoplay,loop,muted. - Supported Audio Formats: MP3, WAV, OGG.
- Embedding Audio Files:
- Video:
- Embedding Videos:
<video>tag. - Attributes:
controls,autoplay,loop,muted,poster. - Supported Video Formats: MP4, WebM, OGG.
- Embedding Videos:
- Embedding External Content:
- Using
<iframe>to Embed Content from Other Websites: YouTube, Google Maps. - Security Considerations with Iframes.
- Using
- SVG Graphics:
- Introduction to Scalable Vector Graphics (SVG).
- Embedding SVG Directly in HTML.
- Basic SVG Shapes and Styling with CSS.
- Accessibility for Multimedia:
- Providing Alternative Text for Images.
- Adding Captions and Transcripts for Audio and Video.
- Ensuring Multimedia Controls are Accessible.
- Description: This module teaches students how to effectively integrate multimedia elements into web pages to enhance user engagement and experience. Students will learn to embed images, audio, and video, optimize them for performance, and ensure accessibility standards are met. Additionally, the module covers the use of SVG graphics for scalable and resolution-independent images.
- Practical Exercises:
- Embed various image formats and optimize their sizes for faster loading.
- Create an audio player with controls and autoplay features.
- Embed a video with a custom poster image and set it to loop.
- Use
<iframe>to embed a YouTube video and understand security attributes. - Draw basic SVG shapes directly within an HTML document.
- Add captions to a video and alternative text to images to improve accessibility.
- Example:

- Module 6: CSS Integration with HTML
- Objective: To apply basic CSS styling to HTML elements to enhance the visual presentation of web pages.
- Topics:
- Introduction to CSS:
- What is CSS and Its Role in Web Development.
- CSS Syntax and Structure: Selectors, properties, and values.
- Including CSS in HTML:
- Inline Styles:
styleattribute. - Internal Stylesheets:
<style>tag within<head>. - External Stylesheets: Linking
.cssfiles using<link>tag.
- Inline Styles:
- Selectors and Properties:
- Basic Selectors: Element, class (
.), and ID (#) selectors. - Combinators: Descendant, child, adjacent sibling, general sibling.
- Pseudo-classes and Pseudo-elements:
:hover,:first-child,::before,::after. - Common CSS Properties:
color,background-color,font-family,font-size,margin,padding,border.
- Basic Selectors: Element, class (
- Box Model:
- Understanding Content, Padding, Border, and Margin.
- Box-sizing Property:
content-boxvs.border-box. - Calculating Total Element Size.
- Layout Techniques:
- Display Properties:
block,inline,inline-block,none. - Positioning:
static,relative,absolute,fixed,sticky. - Float and Clear Properties: Creating multi-column layouts.
- Flexbox:
- Introduction to Flexbox Layout.
- Flex Container and Flex Items.
- Aligning and Distributing Space within Flex Containers.
- Display Properties:
- Responsive Design Basics:
- Media Queries: Syntax and usage.
- Mobile-First Design Principles.
- Creating Flexible Layouts with Percentage Units and Flexbox.
- Styling Forms and Tables:
- Enhancing the Appearance of Form Elements.
- Styling Tables for Better Readability.
- Using CSS to Align and Space Form Fields.
- Typography and Text Styling:
- Font Properties:
font-family,font-size,font-weight,font-style. - Text Alignment and Decoration:
text-align,text-decoration,text-transform. - Line Height and Letter Spacing.
- Font Properties:
- Colors and Backgrounds:
- Color Values: Named colors, HEX, RGB, RGBA, HSL.
- Background Images and Gradients.
- Using CSS Variables for Consistent Styling.
- Transitions and Animations:
- Adding Simple Transitions to Elements.
- Creating Keyframe Animations.
- Animating Properties for Interactive Effects.
- Best Practices for CSS:
- Organizing CSS for Maintainability.
- Using Comments and Consistent Formatting.
- Avoiding Specificity Issues and Redundant Code.
- Optimizing CSS for Performance.
- Description: This module introduces students to CSS (Cascading Style Sheets), the styling language used to control the presentation of HTML elements. Students will learn how to apply various styles, understand the box model, and implement layout techniques to create visually appealing and responsive web pages. Emphasis is placed on integrating CSS with HTML effectively and following best practices for clean and maintainable code.
- Practical Exercises:
- Apply inline, internal, and external CSS styles to HTML elements.
- Use class and ID selectors to style specific elements.
- Create layouts using Flexbox to arrange content horizontally and vertically.
- Implement responsive design using media queries for mobile, tablet, and desktop views.
- Style forms and tables to enhance their appearance and usability.
- Add transitions and animations to interactive elements like buttons and menus.
- Example:

- Module 7: Responsive Web Design with HTML and CSS
- Objective: To create web pages that adapt seamlessly to various screen sizes and devices.
- Topics:
- Understanding Responsive Design:
- Principles of Responsive Web Design.
- Fluid Grids and Flexible Layouts.
- Importance of Mobile-First Design.
- Media Queries:
- Syntax and Usage of Media Queries.
- Targeting Different Devices (Mobile, Tablet, Desktop).
- Combining Multiple Media Queries for Complex Designs.
- Flexible Images and Media:
- Making Images Responsive Using CSS.
- Techniques for Scaling Videos and Other Media Elements.
- Using the
max-widthProperty for Images.
- Viewport Meta Tag:
- Using the
<meta name="viewport">Tag for Responsive Layouts. - Configuring Viewport Settings for Mobile Devices.
- Using the
- Mobile-First vs. Desktop-First Design:
- Understanding the Difference.
- Implementing Mobile-First Design Strategies.
- Advantages of Mobile-First Approach.
- Responsive Navigation Menus:
- Creating Collapsible and Expandable Navigation Menus.
- Using CSS and JavaScript for Responsive Navigation.
- Implementing Hamburger Menus for Mobile Devices.
- Testing Responsive Designs:
- Using Browser Developer Tools to Test Responsiveness.
- Cross-Browser and Cross-Device Compatibility Testing.
- Emulating Different Screen Sizes and Resolutions.
- Frameworks for Responsive Design:
- Introduction to CSS Frameworks Like Bootstrap and Foundation.
- Utilizing Grid Systems and Pre-Built Components for Rapid Development.
- Customizing Frameworks to Fit Specific Design Needs.
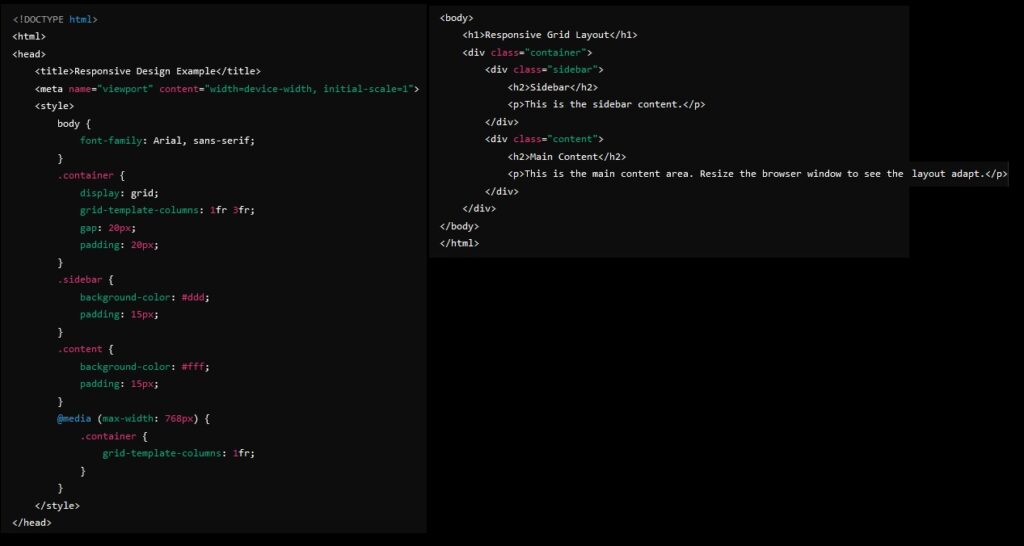
- Description: Responsive web design ensures that web pages look and function well across a variety of devices and screen sizes. This module teaches students how to implement responsive techniques using HTML and CSS, including the use of media queries, flexible grids, and responsive images. Students will learn to design layouts that adjust seamlessly, enhancing user experience on mobile, tablet, and desktop devices.
- Practical Exercises:
- Create a responsive layout using Flexbox or CSS Grid.
- Implement media queries to adjust styles based on screen size.
- Make images and videos scale appropriately on different devices.
- Develop a responsive navigation menu that adapts to mobile screens.
- Test and refine responsive designs using browser developer tools.
- Utilize a CSS framework to build a responsive web page quickly.
- Example:
- Module 8: SEO Best Practices in HTML
- Objective: To implement best practices for search engine optimization (SEO) to improve web page visibility.
- Topics:
- Understanding SEO:
- What is SEO and its importance.
- How search engines index and rank web pages.
- Meta Tags:
- Using
<title>,<meta name="description">, and<meta name="keywords">. - Open Graph meta tags for social media integration.
- Using
- Semantic HTML and SEO:
- Utilizing semantic elements to enhance SEO.
- Structuring content with headings and sections.
- URL Structure and Navigation:
- Creating clean and descriptive URLs.
- Implementing breadcrumbs for better navigation.
- Image Optimization for SEO:
- Using descriptive file names and alt text.
- Compressing images without compromising quality.
- Mobile Optimization:
- Ensuring mobile-friendly design for better SEO ranking.
- Implementing responsive design techniques.
- Internal and External Linking:
- Building a logical internal linking structure.
- Acquiring quality external backlinks.
- Page Load Speed:
- Optimizing HTML and media for faster loading times.
- Minimizing HTTP requests and using caching strategies.
- Content Quality and Relevance:
- Creating high-quality, relevant content.
- Using keywords effectively without keyword stuffing.
- Analytics and Monitoring:
- Integrating Google Analytics and Search Console.
- Monitoring SEO performance and making data-driven improvements.
- Description: Search Engine Optimization (SEO) is crucial for improving the visibility and ranking of web pages on search engines. This module covers the fundamental SEO practices that can be implemented directly within HTML to enhance search engine friendliness. Students will learn to use meta tags, semantic HTML, optimized URLs, and image descriptions to boost SEO performance. Additionally, the module explores strategies for improving page load speed, mobile optimization, and content quality to achieve better search engine rankings.
- Practical Exercises:
- Add and optimize meta tags for a web page.
- Structure content using semantic HTML elements to improve SEO.
- Optimize images with descriptive alt text and appropriate file sizes.
- Create clean, descriptive URLs and implement breadcrumbs.
- Analyze a web page’s SEO performance using Google Analytics and Search Console.
- Example:
- Best Coffee Shops in New York | MyCoffeeGuide
- Best Coffee Shops in New York
- Home
- About
- Contact
- <main>
- <section>
- <article>
- <h2>Joe’s Coffee</h2>
- <p>Located in Midtown, Joe’s Coffee offers a wide range of brews and a cozy atmosphere.</p>
- <img src=”joes-coffee.jpg” alt=”Inside Joe’s Coffee shop” width=”300″>
- </article>
- <article>
- <h2>Central Perk</h2>
- <p>Inspired by the famous TV show, Central Perk provides a unique coffee experience in the heart of NYC.</p>
- <img src=”central-perk.jpg” alt=”Central Perk themed coffee shop” width=”300″>
- </article>
- </section>
- </main>
- <footer>
- <p>© 2024 MyCoffeeGuide. All rights reserved.</p>
- </footer>
- Module 9 : Project Development and Deployment
- Objective: To apply all learned HTML concepts in developing and deploying comprehensive web projects.
- Topics:
- Project Planning:
- Selecting a project topic based on interests and career goals.
- Defining project scope, requirements, and specifications.
- Creating wireframes and mockups for design.
- Design and Development:
- Structuring HTML documents based on project requirements.
- Implementing responsive and accessible designs.
- Integrating multimedia and interactive elements.
- Version Control with Git:
- Introduction to Git and GitHub.
- Initializing a Git repository and committing changes.
- Collaborating using branches and pull requests.
- Testing and Debugging:
- Ensuring cross-browser compatibility.
- Validating HTML for syntax and accessibility.
- Debugging issues using browser developer tools.
- Deployment Techniques:
- Hosting options: GitHub Pages, Netlify, Vercel, traditional web hosts.
- Deploying a static website using GitHub Pages.
- Configuring domain names and DNS settings.
- Maintenance and Updates:
- Regularly updating content and styles.
- Monitoring website performance and accessibility.
- Implementing user feedback and improvements.
- Documentation and Presentation:
- Writing project documentation and user guides.
- Preparing a presentation to showcase the project.
- Demonstrating project features and functionalities.
- Description: The final module focuses on consolidating all the knowledge gained throughout the course by guiding students through the development and deployment of comprehensive web projects. Students will plan, design, develop, test, and deploy their own web applications, ensuring they can apply HTML best practices and integrate multimedia and interactive elements effectively. Additionally, students will learn to use version control systems like Git for project management and collaboration.
- Practical Exercises:
- Plan and outline a web project, including creating wireframes.
- Develop a complete website incorporating all HTML elements, semantic structure, and responsive design.
- Use Git for version control, committing changes, and managing branches.
- Test the website across different browsers and devices for compatibility and responsiveness.
- Deploy the website to a hosting platform like GitHub Pages.
- Document the project with clear instructions and present it to peers and instructors.
- Example: Project Idea: Personal Portfolio Website
- Features:
- Home Page: Introduction and welcome message.
- About Page: Detailed information about the student, including a photo.
- Projects Page: Showcase of projects with descriptions and images.
- Contact Page: Interactive form for users to send messages.
- Responsive Design: Ensuring the portfolio looks good on all devices.
- Accessibility: Implementing best practices for an inclusive user experience.
- Deployment: Hosting the portfolio on GitHub Pages for easy access
- portfolio/
- ├── index.html
- ├── about.html
- ├── projects.html
- ├── contact.html
- ├── styles/
- │ └── styles.css
- ├── images/
- │ ├── profile.jpg
- │ ├── project1.jpg
- │ └── project2.jpg
- └── scripts/
- └── main.js
- Deployment Steps:
- Create a repository on GitHub named
portfolio. - Push the project files to the repository.
- Enable GitHub Pages in the repository settings.
- Access the portfolio via
https://username.github.io/portfolio/. - Assessment and Evaluation
- Quizzes: Regular quizzes at the end of each module to reinforce learning and assess understanding.
- Assignments: Practical assignments involving coding tasks related to each module’s topics.
- Practical Labs: Hands-on lab sessions to implement and test concepts in real-time.
- Mid-Term Exam: An examination covering the first half of the course content.
- Final Project: A comprehensive web development project demonstrating the application of all learned concepts.
- Final Exam: A written and practical exam covering the entire syllabus.
- Recommended Resources
- Books:
- HTML and CSS: Design and Build Websites by Jon Duckett
- Learning Web Design: A Beginner’s Guide to HTML, CSS, JavaScript, and Web Graphics by Jennifer Niederst Robbins
- Responsive Web Design with HTML5 and CSS by Ben Frain
- HTML5: The Missing Manual by Matthew MacDonald
- Online Tutorials:
- Practice Platforms:
- CodePen for experimenting with HTML and CSS.
- JSFiddle for testing HTML snippets.
- HTML Dog for tutorials and exercises.
- Exercism.io for HTML practice problems.
- Development Tools:
- Code Editors: Visual Studio Code, Sublime Text, Atom, Brackets
- Version Control: Git, GitHub, GitLab
- Browser Developer Tools: Chrome DevTools, Firefox Developer Tools
- Additional Tips for Instructors
- Hands-On Approach:
- Encourage students to write and experiment with code regularly to reinforce learning.
- Provide real-world project scenarios to apply programming concepts effectively.
- Interactive Sessions:
- Conduct live coding sessions to demonstrate problem-solving techniques.
- Facilitate group activities and pair programming to enhance collaborative skills.
- Continuous Feedback:
- Offer timely feedback on assignments and projects to guide student progress.
- Create an open environment for questions and discussions to address learning challenges promptly.
- Resource Accessibility:
- Provide access to supplementary materials, coding examples, and reference guides.
- Encourage the use of version control systems (e.g., Git) for managing code projects.
- Emphasize Best Practices:
- Teach students to write clean, readable, and well-documented code.
- Highlight the importance of semantic HTML for accessibility and SEO.
- Promote responsive design principles to ensure web pages are mobile-friendly.
- Sample Module Breakdown
- To give you a clearer picture, here’s a detailed breakdown of Module 4: HTML Forms and Inputs as an example:
- Module Sample : HTML Forms and Inputs
- Objective: To create interactive forms for user input and understand form handling.
- Topics:
- Form Structure:
<form>tag and its attributes (action,method,enctype).
- Input Elements:
- Text fields (
<input type="text">). - Password fields (
<input type="password">). - Radio buttons (
<input type="radio">). - Checkboxes (
<input type="checkbox">). - Submit and reset buttons (
<input type="submit">,<input type="reset">).
- Text fields (
- Select Menus and Options:
<select>and<option>tags.- Creating dropdown menus.
- Text Areas:
<textarea>for multiline input.
- Labels and Fieldsets:
- Associating labels with inputs using
<label>. - Grouping related form elements with
<fieldset>and<legend>.
- Associating labels with inputs using
- Form Validation:
- Basic client-side validation using HTML5 attributes (
required,pattern,minlength, etc.). - Custom validation using JavaScript.
- Basic client-side validation using HTML5 attributes (
- Submitting Forms:
- Understanding form submission and data handling.
- Sending form data to a server using different methods (GET, POST).
- Accessibility in Forms:
- Description: This module explores the creation of forms, which are essential for collecting user input on web pages. Students will learn to use various input elements, organize forms with labels and fieldsets, and implement basic validation to enhance user experience and data integrity. Emphasis is placed on accessibility to ensure that forms are usable by all users, including those with disabilities.
- Practical Exercises:
- Create a contact form with text inputs, radio buttons, checkboxes, and a submit button.
- Design a registration form with password and email fields.
- Implement a dropdown menu for selecting a country.
- Add client-side validation to ensure required fields are filled out correctly.
- Develop accessible forms with proper labels and instructions.
- Contact Us Form
- Contact Us
- Personal Information
- <label for=”name”>Name:</label>
- <input type=”text” id=”name” name=”name” required><br><br>
- <label for=”email”>Email:</label>
- <input type=”email” id=”email” name=”email” required><br><br>
- <label>Gender:</label>
- <input type=”radio” id=”male” name=”gender” value=”male”>
- <label for=”male”>Male</label>
- <input type=”radio” id=”female” name=”gender” value=”female”>
- <label for=”female”>Female</label><br><br>
- <label for=”country”>Country:</label>
- <select id=”country” name=”country”>
- <option value=”usa”>USA</option>
- <option value=”canada”>Canada</option>
- <option value=”uk”>UK</option>
- </select><br><br>
- </fieldset>
- <fieldset>
- <legend>Message</legend>
- <label for=”message”>Your Message:</label><br>
- <textarea id=”message” name=”message” rows=”5″ cols=”30″ required></textarea><br><br>
- </fieldset>
- <input type=”submit” value=”Submit”>
- <input type=”reset” value=”Reset”>
- </form>
- </body> </html>
- This detailed, module-wise HTML syllabus is designed to provide computer students with a structured and comprehensive learning path. By following this syllabus, students will gain both theoretical knowledge and practical experience in HTML, enabling them to create professional, accessible, and optimized web pages. The combination of lectures, hands-on exercises, and project work ensures that students are well-prepared to tackle real-world web development challenges and advance their careers in the field.